Rabu, 20 Oktober 2010

Boilers

Introduction
The primary function of a boiler is to produce steam at a given pressure and temperature. To accomplish this, the boiler serves as a furnace where air is mixed with fuel in a controlled combustion process to release large quantities of heat. The pressure-tight construction of a boiler provides a means to absorb the heat from the combustion and transfer this heat to raise water to a temperature such that the steam produced is of sufficient temperature and quality (moisture content) for steam loads.

Boilers
Two distinct heat sources used for boilers are electric probes and burned fuel (oil, coal, etc.)This chapter will use fuel boilers to illustrate the typical design of boilers. Refer to Figure 9 during the following discussion.

The boiler has an enclosed space where the fuel combustion takes place, usually referred to as the furnace or combustion chamber. Air is supplied to combine with the fuel, resulting in combustion. The heat of combustion is absorbed by the water in the risers or circulating tubes. The density difference between hot and cold water is the driving force to circulate the water back to the steam drum. Eventually the water will absorb sufficient heat to produce steam.

Steam leaves the steam drum via a baffle, which causes any water droplets being carried by the steam to drop out and drain back to the steam drum. If superheated steam is required, the steam may then travel through a superheater. The hot combustion gasses from the furnace will heat the steam through the superheater's thin tube walls. The steam then goes to the steam supply system and the various steam loads.

Some boilers have economizers to improve cycle efficiency by preheating inlet feedwater to the boiler. The economizer uses heat from the boiler exhaust gasses to raise the temperature of the inlet feedwater.


Figure 9 Typical Fuel Boiler
Fuel Boiler Components
Figure 9 illustrates a typical fuel boiler. Some of the components are explained below.

Steam drum - The steam drum separates the steam from the heated water. The
water droplets fall to the bottom of the tank to be cycled again, and the steam leaves the drum and enters the steam system. Feedwater enters at the bottom of the drum to start the heating cycle.

Downcomers - Downcomers are the pipes in which the water from the steam drum travels in order to reach the bottom of the boiler where the water can enter the distribution headers.

Distribution headers - The distribution headers are large pipe headers that carry the water from the downcomers to the risers.

Risers - The piping or tubes that form the combustion chamber enclosure are called risers. Water and steam run through these to be heated. The term risers refers to the fact that the water flow direction is from the bottom to the top of the boiler. From the
risers, the water and steam enter the steam drum and the cycle starts again.

Combustion chamber - Located at the bottom of a boiler, the combustion chamber is where the air and fuel mix and burn. It is lined with the risers.
Boilers Summary
*Boilers are vessels that allow water in contained piping to be heated to steam by a heat source internal to the vessel. The water is heated to the boiling point. The resulting steam separates, and the water is heated again. Some boilers use the heat from combustion off-gasses to further heat the steam (superheat) and/or to preheat the feedwater.

*The following components were discussed:
The steam drum is where the steam is separated from the heated water.

Downcomers are the pipes in which the water from the steam drum travels to reach the bottom of the boiler.

Distribution headers are large pipe headers that carry the water from th downcomers to the risers.

Risers are the piping or tubes that form the combustion chamber enclosure. Water and steam run through the risers to be heated.

The combustion chamber is located at the bottom of the boiler and is where the air and fuel mix and burn.

What is Fatigue

Fatigue is a technical term that elicits a degree of curiosity. When citizens read or hear in their media of another fatigue failure, they wonder whether this has something to do with getting tired or "fatigued" as they know it. Such is not the case.

One way to explain fatigue is to refer to the ASTM standard definitions on fatigue, contained in ASTM E 1150. It is difficult, if not impossible, to carry on intelligent conversations if discussions on fatigue do not use a set of standard definitions such as E 1150. Within E 1150, there are over 75 terms defined, including the term fatigue:
"fatigue (Note 1):
the process of progressive localized permanent structural change occurring in a material subjected to conditions that produce fluctuating stresses and strains at some point or points and that may culminate in cracks or complete fracture after a sufficient number of fluctuations (Note 2). Note 1--In glass technology static tests of considerable duration are called `static fatigue' tests, a type of test generally designated as stress-rupture. Note 2--Fluctuations may occur both in load and with time (frequency) as in the case of `random vibration'." (Ref 2). The words in italics (emphasis added) are viewed as key words in the definition. These words are important perspectives on the phenomenon of fatigue:
· Process
· Progressive
· Localized
· Permanent structural change
· Fluctuating stresses and strains
· Point or points
· Cracks or complete fracture
The idea that fatigue is a process is critical to dealing with it in design and to the characterization of materials as part of design. In fact, this idea is so critical that the entire conceptual view of fatigue is affected by it! Another critical idea is the idea of fluctuating stresses and strains. The need to have fluctuating (repeated or cyclic) stresses acting under either constant amplitude or variable amplitude is critical to fatigue. When a failure is analyzed and attributed to fatigue, the only thing known at that point is that the loads (the stresses/strains) were fluctuating. Nothing is necessarily known about the nucleation of damage that forms the origin of fatigue cracks. Design for Fatigue Prevention In design for fatigue and damage tolerance, one of two initial assumptions is often made about the state of the material. Both of these are related to the need to invoke continuum mechanics to make the stress/strain/fracture mechanics analysis tractable:· The material is an ideal homogeneous, continuous, isotropic continuum that is free of defects or flaws.· The material is an ideal homogeneous, isotropic continuum but contains an ideal cracklike discontinuity that may or may not be considered a defect or flaw, depending on the entire design approach. The former assumption leads to either the stress-life or strain-life fatigue design approach. These approaches are typically used to design for finite life or "infinite life." Under both assumptions, the material is considered to be free of defects, except insofar as the sampling procedure used to select material test specimens may "capture" the probable "defects" when the specimen locations are selected for fatigue tests. This often has proved to be an unreliable approach and has led, at least in part, to the damage-tolerant approach. Another possible difficulty with these assumptions is that inspectability and detectability are not inherent parts of the original design approach. Rather, past and current experience guide field maintenance and inspection procedures, if and when they are considered.The damage-tolerant approach is used to deal with the possibility that a crack-like discontinuity (or multiple ones) will escape detection in either the initial product release or field inspection practices. Therefore, it couples directly to nondestructive inspection (NDI) and evaluation (NDE). In addition, the potential for initiation of crack propagation must be considered an integral part of the design process, and the subcritical crack growth characteristics under monotonic, sustained, and cyclic loads must be incorporated in the design. The final instability parameter, such as plane strain fracture toughness (KIc), also must be incorporated in design. The damage-tolerant approach is based on the ability to track the damage throughout the entire life cycle of the component/system. It therefore requires extensive knowledge of the above issues, and it also requires that fracture (or damage) mechanics models be available to assist in the evaluation of potential behavior. As well, material characterization procedures are needed to ensure that valid evaluation of the required material "property" or response characteristic is made. NDI must be performed to ensure that probability-of-detection determinations are made for the NDI procedure(s) to be used. This approach has proved to be reliable, especially for safety-critical components.The above approaches often are used in a complementary sense in fatigue design. The details of all three approaches are discussed in this Volume.The fatigue process has proved to be very difficult to study. Nonetheless, extensive progress on understanding the phases of fatigue has been made in the last 100 years or so. It now is generally agreed that four distinct phases of fatigue may occur (Ref 3, 4):· Nucleation· Structurally dependent crack propagation (often called the "short crack" or "small crack" phase)· Crack propagation that is characterizable by either linear elastic fracture mechanics, elastic-plastic fracture mechanics, or fully plastic fracture mechanics· Final instabilityEach of these phases is an extremely complex process (or may involve several processes) in and of itself. For example, the nucleation of "fatigue" cracks is extremely difficult to study, and even "pure fatigue" mechanisms can be very dependent on the intrinsic makeup of the material. Obviously, when one decides to pursue the nucleation of cracks in a material, one has already either assumed that the material is crack-free or has proved it! The assumption is the easier path and the one most often taken. When extraneous influences are involved in nucleation, such as temperature effects (e.g., creep), corrosion of all types, or fretting, the problem of modeling the damage is formidable. In recent years, more research has been done on the latter issues, and models for this phase of life are beginning to emerge.

Selasa, 19 Oktober 2010

The Coolest (and smallest) 9V LED Flashlight ever

In this tutorial describes the step by step process to build a very efficient, small, simple, long-lasting and cool LED flashlight. This is a very simple project, so I encourage anyone to attempt it. Here goes...
1. The Parts
What you will need:
  1. Rugged plastic 9v battery clip (also called a PP3 clip)
  2. Push button switch (aka a Tact switch)
  3. Jumbo (10mm) LED or a really bright 5mm LED (choose super- or ultra bright)
  4. The proper resistor(s) for your LED (I'll show the calculation)
  5. 9 volt battery, of course
  6. Some hot glue and a glue gun
  7. Lastly, a soldering iron with some solder
The 9V battery clip, LED(s) and resistor(s) can all be purchased at almost any electronics store like RadioShack. My push button switch came out of an old (broken) VCR - check out some old junk and broken electronics. They usally have buttons that click, and you will probably find some satisfactory switches inside. You could always buy them new if you wanted to (see digikey.com). If you are going to get your switches out of something old, though, you will need to use a "desoldering iron" to remove it. A simple solder sucker works just as well.
Figure 1 : Before and after
2. What LED and resistor(s) to use
For my design, I used a large (10mm) red LED, because it would be very useful to use it on campouts (the red won't ruin your night vision). O and also, because I had it on hand. If you are making a light that you can actually hope to use, then I suggest using a stronger LED that has a higher lumen or millicandella rating (several thousand millicandella (mcd) would be better). These LEDs are not as bright as Power LEDs (see my other tutorial here), but they are cheaper too. I had some strong LEDs here that have 10,000 mcd! Now that's bright! Remember that you should use a resistor in series with a LED, to limit the current and thus protect the LED. But how can we calculate which one to use? You could do it yourself, but then I would have to explain the steps. Rather go to this site and have it done for you.
Figure 2 : Disassembled
3. Putting it all together
Now that you have all the parts you need, it's time to get building (aka the fun stuff).

The easiest, and probably quickest, way to go about this, would be to use the glue to fix the switch, LED, and resistor in place before doing any soldering. If you did this, you can cut the PP3 clip wires to just the right length. Your friends will be impressed with your soldering work. Now, do the next steps WITHOUT the battery clip on to the battery terminals.

Use a wire stripper (I used my teeth) to strip a little bit of plastic off of the ends of the wires, after you have cut them to the perfect length. Next, dip them in flux and tin the wires with some solder. This will make it easier to attach when you're making the connections. The flux will make the solder spread nicely and evenly all over the wire.

Look at the LED. It will have two leads coming out of it. One will be shorter than the other. That one is the negative terminal, the other one is positive. Sometimes the plastic of the LED will be flat on one side. This is the negative side.

The rest is rather logical. Connect the red wire to the positive lead of the LED. Connect the black wire to one of the four legs coming out of the switch. Solder the resistor to the leg that is diagonally across the switch (from where you connected the black wire). Then connect the remaining end of the resistor to your LED. Check to make sure you connected everything correctly. And then cut off the extra two legs on the button switch that you didn't use.

Put on some more glue to make sure everything is on properly. I added some red tape around the battery for the looks.

Thats it! Finished! And you have just made yourself one heck of a great beginners LED flashlight!

Figure 3 : It's alive!!!

Types of Control Valves (Part 2)

Shuttle and fast exhaust valves
A shuttle valve, also known as a double check valve, allows pressure in a line to be obtained from alternative sources. It is primarily a pneumatic device and is rarely found in hydraulic circuits.

Construction is very simple and consists of a ball inside a cylinder, as shown in Figure 4.25a. If pressure is applied to port X, the ball is blown to the fight blocking port Y and linking ports X and A.

Similarly, pressure to port Y alone connects ports Y and A and blocks port X. The symbol of a shuttle valve is given in Figure 4.25b.

A typical application is given in Figure 4.25c, where a spring return cylinder is operated from either of two manual stations.

Isolation between the two stations is provided by the shuttle valve. Note a simple T-connection cannot be used as each valve has its A port vented to the exhaust port.

A fast exhaust valve (Figure 4.26) is used to vent cylinders quickly. It is primarily used with spring return (single-acting) pneumatic cylinders. The device shown in Figure 4.26a consists of a movable disc which allows port A to be connected to


pressure port P or large exhaust port R. It acts like, and has the same symbol as, a shuttle valve. A typical application is shown in Figure 4.26b.

Fast exhaust valves are usually mounted local to, or directly onto, cylinders and speed up response by avoiding any delay from return pipes and control valves. They also permit simpler control valves to be used.

Sequence valves
The sequence valve is a close relative of the pressure relief valve and is used where a set of operations are to be controlled in a pressure related sequence. Figure 4.27 shows a typical example where a workpiece is pushed into position by cylinder 1 and clamped by cylinder 2.

Sequence valve V 2 is connected to the extend line of cylinder 1. When this cylinder is moving the workpiece, the line pressure is low, but rises once the workpiece hits the end stop. The sequence valve opens once its inlet pressure rises above a preset level.
Cylinder 2 then operates to clamp the workpiece. A check valve across V 2 allows both cylinders to retract together.

Time delay valves
Pneumatic time delay valves (Figure 4.28) are used to delay operations where time-based sequences are required. Figure 4.28a shows construction of a typical valve. This is similar in construction to a 3/2 way pilot-operated valve, but the space above the main valve is comparatively large and pilot air is only allowed in via a flow reducing needle valve. There is thus a time delay between application of pilot pressure to port Z and the valve operation, as shown by the timing diagram in Figure 4.28b. The time delay is adjusted by the needle valve setting.

The built-in check valve causes the reservoir space above the valve to vent quickly when pressure at Z is removed to give no delay off.

The valve shown in Figure 4.28 is a normally-closed delay-on valve. Many other time delay valves (delay-off, delay on/off, normally- open) can be obtained. All use the basic principle of the air reservoir and needle valve.

The symbol of a normally-dosed time delay valve is shown in Figure 4.28c.

Proportional Valves
The solenoid valves described so far act, to some extent, like an electrical switch, i.e. they can be On or Off. In many applications it is required to remotely control speed, pressure or force via an electrical signal. This function is provided by proportional valves.

A typical two position solenoid is only required to move the spool between 0 and 100% stroke against the restoring force of a spring. To ensure predictable movement between the end positions the solenoid must also increase its force as the spool moves to ensure the solenoid force is larger than the increasing opposing
spring force at all positions.

A proportional valve has a different design requirement. The spool position can be set anywhere between 0% and 100% stroke by varying the solenoid current. To give a predictable response the solenoid must produce a force which is dependent solely on the
current and not on the spool position, i.e. the force for a given current must be constant over the full stroke range. Furthermore, the force must be proportional to the current.

Figure 4.29 shows a typical response. The force from the solenoid is opposed by the force from a restoring spring, and the spool will move to a position where the two forces are equal. With a current of 0.75 A, for example, the spool will move to 75% of its stroke.

The spool movement in a proportional valve is small; a few mm stroke is typical. The valves are therefore very vulnerable to stiction, and this is reduced by using a 'wet' design which immerses the solenoid and its core in hydraulic fluid.

A proportional valve should produce a fluid flow which is proportional to the spool displacement. The spools therefore use four triangular metering notches in the spool lands as shown on Figure 4.30. As the spool is moved to the right, port A will progressively link to the tank and port B to the pressure line.

The symbol for this valve is also shown. Proportional valves are drawn with parallel lines on the connection sides of the valve block on circuit diagrams.

Figure 4.30 gives equal flow rates to both A and B ports.Cylinders have different areas on the full bore and annulus sides
(see Figure 5.4). To achieve equal speeds in both directions, the notches on the lands must have different areas. With a 2:1 cylinder ratio, half the number of notches are used on one side.

Figure 4.31 shows the construction and symbol for a restricted centre position valve. Here the extended notches provide a restricted (typically 3%) flow to tank from the A and B ports when the valve is in the centre position.

Types of Control Valves(Part 1)

Types of control valve
There are essentially three types of control valve; poppet valves, spool valves and rotary valves.

Poppet valves
In a poppet valve, simple discs, cones or balls are used in conjunction with simple valve seats to control flow. Figure 4.9 shows the construction and symbol of a simple 2/2 normally-closed valve, where depression of the pushbutton lifts the ball off its seat and
allows fluid to flow from port P to port A. When the button is released, spring and fluid pressure force the ball up again closing the valve.

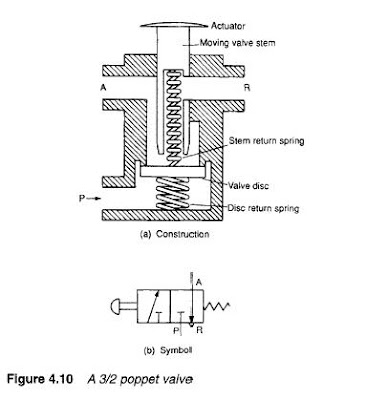
Figure 4.10 shows the construction and symbol of a disc seal 3/2 poppet. With the pushbutton released, ports A and R are linked via the hollow pushbutton stem. If the pushbutton is pressed, port R is first sealed, then the valve disc pushed down to open the valve and connect ports P and A. As before, spring and fluid pressure from
port P closes the valve.

The valve construction and symbol shown in Figure 4.11 is a poppet changeover 4/2 valve using two stems and disc valves. With the pushbutton released, ports A and R are linked via the hollow left-hand stem and ports P and B linked via the normally-open right hand disc valve. When the pushbutton is pressed, the link between ports A and R is first closed, then the link between P and B closed.

The link between A and P is next opened, and finally the link between B and R opened. When the pushbutton is released, air and spring pressure puts the valve back to its original state.

Poppet valves are simple, cheap and robust, but it is generally simpler to manufacture valves more complicated than those shown in Figure 4.11 by using spool valves. Further, a major disadvantage of poppet valves is the force needed to operate them. In the poppet valve of Figure 4.10, for example, the force required on the pushbutton
to operate the valve is P x a newtons. Large capacity valves need large valve areas, leading to large operating force. The high pressure in hydraulic systems thus tends to prevent use of simple
poppet valves and they are, therefore, mainly found in low pressure pneumatic systems.
Spool valves
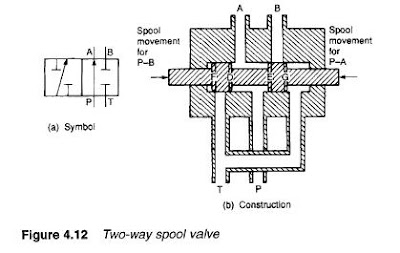
Spool (or slide) valves are constructed with a spool moving horizontally within the valve body, as shown for the 4/2 valve in Figure 4.12. Raised areas called 'lands' block or open ports to give the required operation.

The operation of a spool valve is generally balanced. In the valve construction in Figure 4.12b, for example, pressure is applied to opposing faces D and E and low tank pressure to faces F and G.

There is no net force on the spool from system pressure, allowing the spool to be easily moved.
Figure 4.13 is a changeover 4/2 spool valve. Comparison of the valves shown in Figures 4.12 and 4.13 shows they have the same body construction, the only difference being the size and position of lands on the spool. This is a major cost-saving advantage of spool valves; different operations can be achieved with a common body and different spools. This obviously reduces manufacturing costs.

Figure 4.14 shows various forms of three position changeover valves; note, again, these use one body with different functions achieved by different land patterns.
Spool valves are operated by shifting the spool. This can be achieved by button, lever or striker, or remotely with a solenoid.

Self-centring can easily be provided if springs are mounted at the end of the spool shaft.

Solenoid-operated valves commonly work at 24 V DC or 110 V AC. Each has its own advantages and disadvantages. A DC power supply has to be provided for 24 V DC solenoids, which, in large systems, is substantial and costly. Operating current of a 24 V solenoid is higher than a 110 V solenoid's. Care must be taken with plant cabling to avoid voltage drops on return legs if a common single line return is used.

Current through a DC solenoid is set by the winding resistance. Current in an AC solenoid, on the other hand, is set by the inductance of the windings, and this is usually designed to give a high inrush current followed by low holding current. This is achieved by using the core of the solenoid (linked to the spool) to raise the coil inductance when the spool has moved. One side effect of this is that a jammed spool results in a permanent high current which can damage the coil or the device driving it.

Each and every AC solenoid should be protected by an individual fuse. DC solenoids do not suffer from this characteristic. A burned out DC solenoid coil is
almost unknown.

Whatever form of solenoid is used it is very useful when fault finding to have local electrical indication built into the solenoid plug top. This allows a fault to be quickly identified as either an electrical or hydraulic problem. Fault finding is discussed further in Chapter 8.

A solenoid can exert a pull or push of about 5 to 10 kg. This is adequate for most pneumatic spool valves, but is too low for direct operation of large capacity hydraulic valves. Here pilot operation must be used, a topic discussed later.

Rotary valves
Rotary valves consist of a rotating spool which aligns with holes in the valve casing to give the required operation. Figure 4.15 shows the construction and symbol of a typical valve with centre off action.

Rotary valves are compact, simple and have low operating forces. They are, however, low pressure devices and are consequently mainly used for hand operation in pneumatic systems.

Pilot-operated valves
With large capacity pneumatic valves (particularly poppet valves) and most hydraulic valves, the operating force required to move the valve can be large. If the required force is too large for a solenoid or manual operation, a two-stage process called pilot operation is used.

The principle is shown in Figure 4.16. Valve 1 is the main operating valve used to move a ram. The operating force required to move the valve, however, is too large for direct operation by a solenoid, so a second smaller valve 2, known as the pilot valve, has been added to allow the main valve to be operated
by system pressure. Pilot pressure lines are normally shown dotted in circuit diagrams, and pilot ports on main valves are denoted Z, Y, X and so on.

In Figure 4 16, pilot port Z is depressurised with the solenoid deenergised, and the ram is retracted. When the solenoid is energised valve 2 changes over, pressurising Z; causing valve 1 to energize and the ram to extend.

Although pilot operation can be achieved with separate valves it is more usual to use a pilot/main valve assembly manufactured as a complete ready made unit. Figure 4.17 shows the operation of a pilot-operated 3/2 pneumatic valve. The solenoid operates
the small pilot valve directly. Because this valve has a small area, a low operating force is required. The pilot valve applies line pressure to the top of the control valve causing it to move down, closing the exhaust port. When it contacts the main valve disc there are two forces acting on the valve stem. The pilot valve applies a downwards force of P x D, where P is the line pressure and D is the area of the control valve. Line pressure also applies an upwards force P x E to the stem, where E is the area of the main valve.

The area of the control valve, D, is greater than area of the main valve E, so the downwards force is the larger and the valve opens.

When the solenoid de-energises, the space above the control valve is vented. Line an spring pressure on the main valve causes the valve stem to rise again, venting port A.

A hydraulic 4/2 pilot-operated spool valve is shown in Figure4.18. The ends of the pilot spool in most hydraulic pilot-operated valves are visible from outside the valve. This is useful from a maintenance viewpoint as it allows the operation of a valve to be
checked. In extreme cases the valve can be checked by pushing the pilot spool directly with a suitably sized rod (welding rod is ideal !).

Care must be taken to check solenoid states on dual solenoid valves before attempting manual operation. Overriding an energised AC solenoid creates a large current which may damage the coil, (or blow the fuse if the solenoid has correctly installed protection).


Check valves
Check valves only allow flow in one direction and, as such, are similar in operation to electronic diodes. The simplest constructionis the ball and seat arrangement of the valve in Figure 4.19a, commonly used in pneumatic systems. The right angle construction in Figure 4.19b is better suited to the higher pressures of a hydraulic

system. Free flow direction is normally marked with an arrow on the valve casing.

A check valve is represented by the graphic symbols in Figure 4.20. The symbol in Figure 4.20a is rather complex and the simpler symbol in Figure 4.20b is more commonly used.
Figure 4.21 illustrates several common applications of check valves. Figure 4.21a shows a combination pump, used where an application requires large volume and low pressure, or low volume and high pressure. A typical case is a clamp required to engage quickly (high volume and low pressure) then grip (minimal volume but high pressure). Pump 1 is the high volume and low pressure pump, and pump 2 the high pressure pump. In high volume mode both pumps deliver to the system, pump 1 delivering through the check valve V 3. When high pressure is required, line pressure at X rises operating unloading valve V 1 via pilot port Z taking pump 1 off load. Pump 2 delivers the required pressure set by relief valve V 2, with the check valve preventing fluid leaking back to pump 1 and V1.

Figure 4.21b shows a hydraulic circuit with a pressure storage device called an accumulator (described in a later chapter). Here a check valve allows the pump to unload via the pressure regulating valve, while still maintaining system pressure from the accumulator.

A spring-operated check valve requires a small pressure to open (called the cracking pressure) and acts to some extent like a low pressure relief valve. This characteristic can be used to advantage.

In Figure 4.21c pilot pressure is derived before a check valve, and in Figure 4.21 d a check valve is used to protect a blocked filter by diverting flow around the filter when pressure rises. A check valve is also included in the tank return to prevent fluid being sucked out of the tank when the pump is turned off.

Pilot-operated check valves
The cylinder in the system in Figure 4.22 should, theoretically, hold position when the control valve is in its centre, off, position. In practice, the cylinder will tend to creep because of leakage in the control valve.

Check valves have excellent sealage in the closed position, but a simple check valve cannot be used in the system in Figure 4.22 because flow is required in both directions. A pilot-operated check is similar to a basic check valve but can be held open permanently by application of an external pilot pressure signal.

There are two basic forms of pilot-operated check valves, shown in Figure 4.23. They operate in a similar manner to basic check valves, but with pilot pressure directly opening the valves. In the 4C valve shown in Figure 4.23a, inlet pressure assists the pilot. The

symbol of a pilot-operated check valve is shown in Figure 4.23c. The cylinder application of Figure 4.22 is redrawn with pilot operated check valves in Figure 4.23d. The pilot lines are connected to the pressure line feeding the other side of the cylinder. For any cylinder movement, one check valve is held open by flow (operating
as a normal check valve) and the other is held open by pilot pressure. For no required movement, both check valves are closed and the cylinder is locked in position.

Restriction check valves
The speed of a hydraulic or pneumatic actuator can be controlled by adjusting the rate at which a fluid is admitted to, or allowed out from, a device. This topic is discussed in more detail in Chapter 5 but a speed control is often required to be direction-sensitive and this requires the inclusion of a check valve.

A restriction check valve (often called a throttle relief valve in pneumatics) allows full flow in one direction and a reduced flow in the other direction. Figure 4.24a shows a simple hydraulic valve and Figure 4.24b a pneumatic valve. In both, a needle valve sets restricted flow to the required valve. The symbol of a restriction
check valve is shown in Figure 4.24c.

Figure 4.24d shows a typical application in which the cylinder extends at full speed until a limit switch makes, then extend further at low speed. Retraction is at full speed.

A restriction check valve V 2 is fitted in one leg of the cylinder. With the cylinder retracted, limit-operated valve V 3 is open allowing free flow of fluid from the cylinder as it extends. When the striker plate on the cylinder ram hits the limit, valve V 3 closes and flow out of the cylinder is now restricted by the needle valve setting
of valve V 2. In the reverse direction, the check valve on valve V 2 opens giving full speed of retraction.

Coupling Alignment

Coupling Alignment
Good service life of the pump and driver
depends upon good alignment through the
flexible coupling. If the electric motor was
mounted at the factory, the pump and motor
were in alignment when shipped.

The alignment between the pump and driver should be inspected after installation to ensure that transportation or other handling has not caused misalignment of the unit.

Poor alignment may cause failure of the coupling, pump, motor, or bearings.

Alignment must not be attempted until the base is in position and the mounting and flange bolts have been tightened.

The recommended procedure for coupling
alignment is with the use of a dial indicator,
as illustrated in Figures 1 and 2.

The dial indicator is attached to one coupling halfwith the indicator button resting on the O.D. of the other coupling half to measure offset HALCO 1780 “W” Maintenance Page 3 misalignment.

To measure angular misalignment, the indicator is positioned so that the buttons rest on the face, near the O.D., of the other coupling half.

Rotate the shaft and dial indicator one revolution while the other shaft remains stationary and note the T.I.R.

Unless otherwise specified by the coupling manufacturer, offset misalignment should be limited to 0.005 inches T.I.R.

Adjust the alignment by loosening the pump or driver mounting bolts and retighten or shim as required.


Figure 1


Measuring Offset Misalignment With A Dial Gauge
Figure 2
Measuring Angular Misalignment With A Dial Gauge


In areas where a dial indicator arrangement is not available, an adequate job of alignment can be done with a straightedge. This method is especiallyuseful if the coupling used contains a rubber drive element.

To check offset misalignment, lay the straightedge in line with the shafts on the O.D.’s of the coupling halves. There should be no gaps under the straightedge. Check two locations 90 degrees apart. Angular misalignment can be checked by measuring the gap between coupling half faces. There should be no more than a 1/64 inch gap under the straightedge or a 1/64 inch variation in the gap between the coupling halves. See Figures 1A and 2A.


Figure 1A
Measuring Offset Misalignment Using a Straightedge


Figure 2A


Measuring Angular Misalignment Using A Straightedge


Note: Further reference on coupling alignment can be found in Hydraulic Institute Standards, 13th edition, pages 177, 120.

Pipes in the oceans to pump up water

Science Museum head Chris Rapley and Gaia theorist James Lovelock are suggesting to install flotillas of vertical pipes in the tropical seas. Free-floating or tethered vertical pipes could pump up nutrient-rich waters from below the thermocline in order to mix them with the relatively barren waters at the ocean surface.

Such pipes could be 100 to 200 metres long, 10 metres in diameter and with a one-way flap valve at the lower end in order to pump water upwards powered by by wave movement. The water pumped up this way could fertilize algae in the surface waters and stimulate them to bloom. More specifically, pumping up water through such pipes would result in an increased presence in the surface waters of the salp, a tiny tube-like species that excretes carbon in its solid faecal pellets. This carbon would subsequently descend to the ocean floor. The hope is that this could store carbon away for millennia on the ocean floor.

An additional effect would be that the algae produced an abundance of dimethyl sulphide (DMS), a chemical that acts as the precursor of nuclei that form sunlight-reflecting clouds. As more clouds would form above the ocean, more sunlight would be reflected away from the Earth's surface, resulting in relative cooling of the ocean underneath.

US company Atmocean has in fact already started trials with this type of technology, using pipes that bring cold water to the surface from a depth of 200m.

Centrifugal Compressor

Introduction
Air compressors of various designs are used widely throughout DOE facilities in numerous applications. Compressed air has numerous uses throughout a facility including the operation of equipment and portable tools. Three types of designs include reciprocating, rotary, and centrifugal air compressors.


Centrifugal Compressors
The centrifugal compressor, originally
built to handle only large volumes of low

pressure gas and air (maximum of 40
psig), has been developed to enable it to
move large volumes of gas with discharge
pressures up to 3,500 psig. However,
centrifugal compressors are now most
frequently used for medium volume and
medium pressure air delivery. One
advantage of a centrifugal pump is the
smooth discharge of the compressed air.

The centrifugal force utilized by the
centrifugal compressor is the same force
utilized by the centrifugal pump. The air
particles enter the eye of the impeller,
designated D in Figure 6. As the impeller rotates, air is thrown against the casing of the compressor. The air
becomes compressed as more and more air is thrown out to the casing by the impeller blades.

The air is pushed along the path designated A, B, and C in Figure 6. The pressure of the air is increased as it is pushed along this path. Note in Figure 6 that the impeller blades curve forward, which is opposite to the backward curve used in typical centrifugal liquid pumps.

Centrifugal compressors can use a variety of blade orientation including both forward and backward curves as well as other designs.

There may be several stages to a centrifugal air compressor, as in the centrifugal pump, and the result would be the same; a higher pressure would be produced. The air compressor is used to create compressed or high pressure air for a variety of uses.

Some of its uses are pneumatic control devices, pneumatic sensors, pneumatic valve operators, pneumatic motors, and starting air for diesel engines.

Types of Gears

A SPUR GEAR
is cylindrical in shape, with teeth on the outer
circumference that are straight and parallel to the axis (hole).
There are a number of variations of the basic spur gear,
including pinion wire, stem pinions, rack and internal gears.
(See Figure 1.17)

PINION WIRE
is a long wire or rod that has been drawn
through a die so that gear teeth are cut into its surface.
It can be made into small gears with different face widths,
hubs, and bores. Pinion wire is stocked in 4 ft. lengths.
(See Figure 1.18)

STEM PINIONS
are bore-less spur gears with small numbers of
teeth cut on the end of a ground piece of shaft. They are
especially suited as pinions when large reductions are
desired. (See Figure 1.19)

RACK
are yet another type of spur gear. Unlike the basic spur
gear, racks have their teeth cut into the surface of a straight
bar instead of on the surface of a cylindrical blank. Rack is
sold in two, four and six foot lengths, depending on pitch,
which you will learn about starting in chapter 2.
(See Figure 1.20)

INTERNAL GEARS
have their teeth cut parallel to their shafts
like spur gears, but they are cut on the inside of the gear blank.
(See Figure 1.21)

HELICAL GEARS
A helical gear is similar to a spur gear except that the teeth
of a helical gear are cut at an angle (known as the helix
angle) to the axis (or hole). Helical gears are made in both
right and left hand configurations. Opposite hand helical
gears run on parallel shafts. Gears of the same hand operate
with shafts at 90-degrees. (See Figure 1.22, 1.23, 1.24, 1.25)

BEVEL GEARSA bevel gear is shaped like a section of a cone and usually operates
on shafts at 90-degrees. The teeth of a bevel gear may be straight
or spiral. If they are spiral, the pinion and gear must be of opposite
hand in order for them to run together. Bevel gears, in contrast
to miter gears (see below), provide a ratio (reduce speed) so the
pinion always has fewer teeth. (See Figure 1.26, 1.27)
MITER GEARS
Miter gears are identical to bevel gears except that in a miter
gear set, both gears always have the same number of teeth.
Their ratio, therefore, is always 1 to 1. As a result, miter gears
are not used when an application calls for a change of speed.
(See Figure 1.28, 1.29)
WORMS & WORM GEARSWORM Worms are a type of gear with one or more cylindrical
threads or “starts” (that resemble screw threads) and a face that
is usually wider than its diameter. A worm gear has a center
hole (bore) for mounting the worm on a shaft. (See Figure 1.30A)
WORM GEARS – like worms – also are usually cylindrical and
have a center hole for mounting on a shaft. The diameter of
a worm gear, however, is usually much greater than the
width of its face. Worm gears differ from spur gears in that
their teeth are somewhat different in shape, and they are
always formed on an angle to the axis to enable them to
mate with worms. (See Figure 1.30B)
Worms and worm gears work in sets, rotating on shafts at right
angles to each other, in order to transmit motion and power
at various speeds and speed ratios. In worm and worm gear sets,
both the worm and worm gear are of the same hand. (Because
right- hand gearing is considered standard, right-hand sets will
always be furnished unless otherwise specified.) (See Figure 1.30)

Pumps Characteristic CURVES

*Centrifugal Pump Characteristic Curves
For a given centrifugal pump operating at a constant speed, the flow rate through the pump is dependent upon the differential pressure or head developed by the pump.

The lower the pump head, the higher the flow rate. A vendor manual for a specific pump usually contains a curve of pump flow rate versus pump head called a pump characteristic curve. After a pump is installed in a system, it is usually tested to ensure that the flow rate and head of the pump are within the required specifications. A typical centrifugal pump characteristic curve is shown in Figure 11.

There are several terms associated with the pump characteristic curve that must be defined.

Shutoff head is the maximum head that can be developed by a centrifugal pump operating at a
set speed.

Pump runout is the maximum flow that can be developed by a centrifugal pump
without damaging the pump. Centrifugal pumps must be designed and operated to be protected from the conditions of pump runout or operating at shutoff head.


*Positive Displacement Pump Characteristic Curves

Positive displacement pumps deliver a definite volume of liquid for each cycle of pump operation. Therefore, the only factor that effects flow rate in an ideal positive displacement pump is the speed at which it operates. The
flow resistance of the system in which the pump is operating will not effect the flow rate through the pump.

Figure 21 shows the characteristic curve for a positive
displacement pump.

The dashed line in Figure 21 shows actual positive
displacement pump performance. This line reflects the
fact that as the discharge pressure of the pump increases,
some amount of liquid will leak from the discharge of the
pump back to the pump suction, reducing the effective
flow rate of the pump. The rate at which liquid leaks
from the pump discharge to its suction is called slippage.